The lighting system in machine vision systems is an extremely important part, and its quality directly affects the subsequent image processing. A good lighting system can reduce a lot of image processing work and improve the efficiency of the entire machine vision system. So what is lighting like? How to choose a suitable lighting system in a machine vision system?
Appropriate lighting is the key to the success of machine vision applications and is the first consideration. A well-designed lighting system not only brings better performance and saves time, but also saves costs in the long run.
1. Please use high brightness light to detect material defects;
2. Please use light of appropriate wavelength for precise positioning;
3. Please use non diffuse light to detect scratches on the glass;
4. Please use diffuse light to test transparent packaging;
5. Create contrast by using colored light;
6. Use strobe to detect rapidly moving objects;
7. Please use infrared light when eliminating reflections;
8. To eliminate color changes, please use infrared light.
Machine vision systems rely on image quality during operation, and high-quality images can enable the system to extract information more accurately from detected objects. In visual applications, image quality largely depends on lighting conditions:Color, angle, and number of light sources。
Lighting depends on the size of the detected object, surface features, partial geometric features, and system requirements.
1. Is the surface smooth or rough?
2. Is the surface dull or bright?
3. Is the object curved or flat?
4. What is the color of the barcode or marking?
5. Is it detecting moving objects or stationary objects?
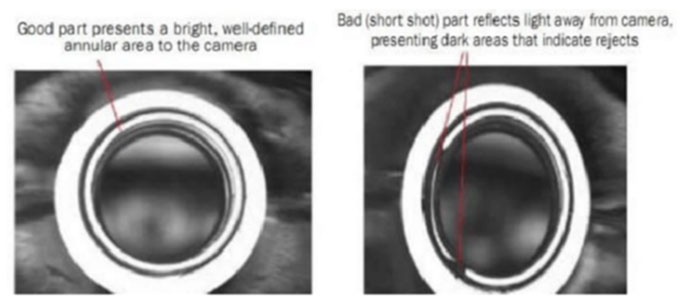
Example: Verifying material defects in plastic pouring
Through the application of plastic casting, it is possible to verify whether there are any defects in the material, which is crucial for ensuring the sealing surface is in good condition. When there is material defect (such as insufficient material poured into the model), adverse conditions will arise.
Lighting technology: bright field
Bright field lighting technology relies on surface texture and flat terrain. When light encounters a flat and reflective surface, it reflects back to the camera, creating a bright area. Rough textures or surface defects can scatter light away from the camera, creating dark areas.

For example, detecting Flipped Chips and verifying the appropriate part orientation in PCB assembly is a common machine vision application.
Lighting technology: bright field
To verify the assembly issue, use a blue light wavelength to illuminate the orientation of the chip. This lighting technology relies on wavelength and coaxial lighting geometry. The blue wavelength (460 nanometers) can effectively distinguish between silver and copper surfaces: copper absorbs blue light in a dark field, while silver reflects blue light in a bright field. Coaxial illumination geometry eliminates erroneous reflections: unwanted bright spots, reflections, and dark spots.

For example, detecting cracks on glass containers
Lighting Technology: Dark Field
In this application, dark field illumination is used to create a bright and easily detectable feature of interest in a dark background. Light passes directly through transparent bottles in a dark field area. Most rays that penetrate transparent objects are not detected by the camera. If the material is irregular, such as cracks, some light will highlight this irregularity. Especially scratches create an internal void, where light refracts and reflects, scattering at many angles including returning to the camera. These rays transform difficult to detect scratches into bright features in a dark background.

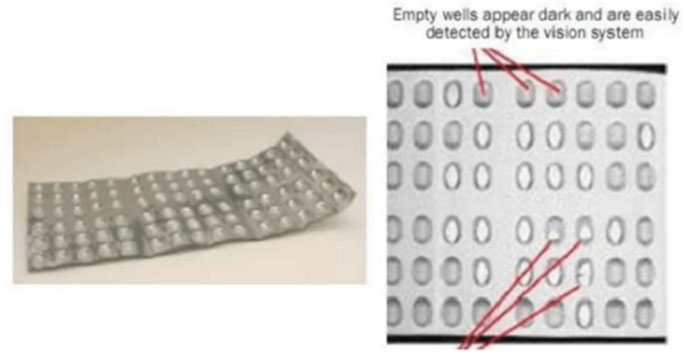
For example, verifying the content of blister packaging
Lighting Technology: Continuous Diffuse
Continuous diffuse lighting technology does not emphasize changes in surface texture and elevation. It provides a very large fixed lighting angle, allowing light to find objects from multiple angles, thus eliminating reflections and typical non directional or single light source shadows.

A useful method for creating a high contrast image in machine vision applications is to illuminate objects with special wavelengths (colors) of light. For black and white cameras, the wavelength of light can make features similar to color brighter or darker. Using colored wheels as a reference, select a light of opposite color to darken the features; Or choose the same color of light to make the features brighter.
For example:
If the feature you want to darken is red, use green light;
2. Using green light can make the green features appear brighter;
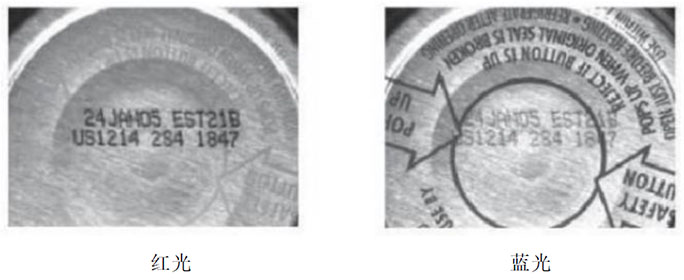
3. Remember the difference between engraving on aluminum under red and blue light.

When an object moves rapidly and its imaging becomes blurry, a strobe flash is needed.
Strobe width=field of view ÷ pixels/movement speed.
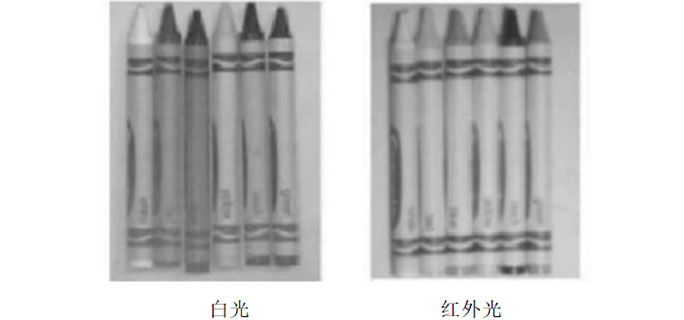
Machine vision systems rely on grayscale conversion in digital images. In many visual applications, ambient light can cause bright reflections that affect image quality, which can be solved by infrared light.

Infrared light can be used between colored objects to eliminate grayscale differences. Dark objects absorb infrared wavelengths, creating consistency, while others present shadows. This lighting scheme is beneficial for detecting inconsistencies in color or shadow changes.

Choosing a suitable lighting scheme for a machine vision system requires consideration from multiple perspectives. Choosing the right one from these tips and combining it with the characteristics of your own system will yield twice the result with half the effort!